About the infrastructure Link to heading
I’ll provision the environment using Hetzner and Cloudflare. The process could be better but should be simple to maintain and follow.
Contents:
Provisioning all the things Link to heading
To host the code, I’ll need two things:
- A DNS domain -
flakm.com - A NixOs server that will host code
Since native support for NixOs on major cloud providers is lacking,
I’ve used fantastic project nixos-anywhere with tofu server provisioning code taken straight from provider examples.
Prerequisites for provisioning the instance are:
- Hetzner API token
- Cloudflare account and token
- DNS domain managed by CF (
flakm.comin my case)
Environment setup Link to heading
I’m using a yubikey smart card with a gpg agent for ssh authentication, and my public key is located in ~/.ssh/id_rsa_yubikey.pub.
I like this setup, and the key never touched the disk on my computer. But there is no problem if you don’t have one. You might just use plain ssh keys.
Once you have all the other prerequisites nailed down, you will need the following environment variables:
export CLOUDFLARE_API_TOKEN="..." # account token
export HCLOUD_TOKEN="" # Hetzner API token
export TF_VAR_ZONE_ID="" # Cloud flare zone id
🚢 to ☁️ Link to heading
Host declarative configuration Link to heading
Nixos-anywhere examples inspired the NixOs configuration. The entry point to the configuration is in a flake.nix
# flake.nix
{
  inputs = {
    nixpkgs.url = "github:NixOS/nixpkgs/nixpkgs-unstable";

    disko = {
      url = "github:nix-community/disko";
      inputs.nixpkgs.follows = "nixpkgs";
    };
  };

  outputs = { nixpkgs, disko, ... }:
    let
      # The system we are building for. It will not work on other systems.
      # One might use flake-utils to make it work on other systems.
      system = "x86_64-linux";

      # Import the Nix packages from nixpkgs
      pkgs = import nixpkgs { inherit system; };
    in
    {
      # Define a formatter package for the system to enable `nix fmt`
      formatter.${system} = pkgs.nixpkgs-fmt;

      # NixOS configuration for the 'blog' system
      nixosConfigurations.blog = nixpkgs.lib.nixosSystem {
        inherit system;
        modules = [
          disko.nixosModules.disko  # Include disko module
          ./configuration.nix       # Include custom configuration
        ];
      };

      # Development shell environment
      # It will include the packages specified in the buildInputs attribute
      # once the shell is entered using `nix develop` or direnv integration.
      devShell.${system} = pkgs.mkShell {
        buildInputs = with pkgs; [
          opentofu  # provisioning tool for the OpenTofu project
          ponysay   # just for fun run `ponysay hello`
        ];
      };
    };
}
My root flake imports host’s configuration located in configuration.nix:
# configuration.nix
{ modulesPath, ... }: {
  imports = [
    # Adds availableKernelModules, kernelModules for instances running under QEMU (Ie Hetzner Cloud)
    (modulesPath + "/profiles/qemu-guest.nix")
    # Contains the configuration for the disk layout
    ./disk-config.nix
  ];

  # Use the GRUB 2 boot loader.
  boot.loader.grub = {
    # no need to set devices, disko will add all devices that have a EF02 partition to the list already
    # devices = [ ];
    efiSupport = true;
    efiInstallAsRemovable = true;
  };

  # Enable ssh access to the root user
  services.openssh.enable = true;
  users.users.root.openssh.authorizedKeys.keys = [
    "ssh-rsa AAAAB3NzaC1yc2EAAAADAQABAAACAQDh6bzSNqVZ1Ba0Uyp/EqThvDdbaAjsJ4GvYN40f/p9Wl4LcW/MQP8EYLvBTqTluAwRXqFa6fVpa0Y9Hq4kyNG62HiMoQRjujt6d3b+GU/pq7NN8+Oed9rCF6TxhtLdcvJWHTbcq9qIGs2s3eYDlMy+9koTEJ7Jnux0eGxObUaGteQUS1cOZ5k9PQg+WX5ncWa3QvqJNxx446+OzVoHgzZytvXeJMg91gKN9wAhKgfibJ4SpQYDHYcTrOILm7DLVghrcU2aFqLKVTrHSWSugfLkqeorRadHckRDr2VUzm5eXjcs4ESjrG6viKMKmlF1wxHoBrtfKzJ1nR8TGWWeH9NwXJtQ+qRzAhnQaHZyCZ6q4HvPlxxXOmgE+JuU6BCt6YPXAmNEMdMhkqYis4xSzxwWHvko79NnKY72pOIS2GgS6Xon0OxLOJ0mb66yhhZB4hUBb02CpvCMlKSLtvnS+2IcSGeSQBnwBw/wgp1uhr9ieUO/wY5K78w2kYFhR6Iet55gutbikSqDgxzTmuX3Mkjq0L/MVUIRAdmOysrR2Lxlk692IrNYTtUflQLsSfzrp6VQIKPxjfrdFhHIfbPoUdfMf+H06tfwkGONgcej56/fDjFbaHouZ357wcuwDsuMGNRCdyW7QyBXF/Wi28nPq/KSeOdCy+q9KDuOYsX9n/5Rsw== cardno:000614320136"
  ];

  system.stateVersion = "23.11";
}
The contents of disk-config.nix are copied straight out the example mentioned before.
Provisioning infrastructure Link to heading
Here is the complete terraform deployment definition:
terraform {
  required_providers {
    cloudflare = {
      source = "cloudflare/cloudflare"
    }
    hcloud = {
      source = "hetznercloud/hcloud"
    }
    null = {
      source = "hashicorp/null"
    }
  }
}

# Configuration for SSH key to be used with Hetzner Cloud instances
resource "hcloud_ssh_key" "yubi" {
  name       = "foo"
  public_key = chomp(file("~/.ssh/id_rsa_yubikey.pub"))
}

# Define a Hetzner Cloud Server resource for the blog
resource "hcloud_server" "blog" {
  name        = "blog-instance"
  image       = "ubuntu-22.04"   # After provisioning, NixOS will be installed see @install
  server_type = "cpx11"          # AMD 2 vCPU, 2 GB RAM, 40 GB NVMe SSD
  location    = "fsn1"
  ssh_keys    = [hcloud_ssh_key.yubi.id]  # SSH keys associated with the server
}

# Output the public IP address of the Hetzner Cloud Server
output "public_ip" {
  value = hcloud_server.blog.ipv4_address
}

# Define a variable for Cloudflare Zone ID
variable "ZONE_ID" {
  # Environment variable for Cloudflare Zone ID
  # export TF_VAR_ZONE_ID="..."
}

# Cloudflare DNS A record configuration for the blog
# This is used for the blog to be accessible directly via the IP ip address
# The blog will be also accessible via the domain name behind the Cloudflare proxy
# See @blog for the CNAME record and cloudflare_page_rule for the url
# This way the communication between Cloudflare and the blog is encrypted
resource "cloudflare_record" "blog_nginx" {
  zone_id = var.ZONE_ID
  name    = "blog.flakm.com"
  value   = hcloud_server.blog.ipv4_address
  type    = "A"
  proxied = false  # Direct DNS, no Cloudflare proxy
}

# Cloudflare DNS CNAME record for the blog behind Cloudflare proxy
resource "cloudflare_record" "blog" {
  zone_id = var.ZONE_ID
  name    = "@"
  value   = "blog.flakm.com"
  type    = "CNAME"
  proxied = true  # Enable Cloudflare proxy
}

# Configure settings for the flakm.com domain in Cloudflare
resource "cloudflare_zone_settings_override" "flakm-com-settings" {
  zone_id = var.ZONE_ID

  settings {
    tls_1_3                  = "on"
    automatic_https_rewrites = "on"
    ssl                      = "strict"
    cache_level              = "aggressive"
  }
}

# Cloudflare page rule for caching and optimizations
resource "cloudflare_page_rule" "blog" {
  zone_id = var.ZONE_ID
  target = "https://flakm.com"
  priority = 1

  actions {
    cache_level = "cache_everything"  # Cache HTML and other assets
  }
}

# NixOS system build module from Nixos anywhere
module "system-build" {
  source    = "github.com/nix-community/nixos-anywhere//terraform/nix-build"
  attribute = ".#nixosConfigurations.blog.config.system.build.toplevel"
}

# Module for disk partitioning script
module "disko" {
  source    = "github.com/nix-community/nixos-anywhere//terraform/nix-build"
  attribute = ".#nixosConfigurations.blog.config.system.build.diskoScript"
}

# Module for installing NixOS on the provisioned server
module "install" {
  source            = "github.com/nix-community/nixos-anywhere//terraform/install"
  nixos_system      = module.system-build.result.out
  nixos_partitioner = module.disko.result.out
  target_host       = hcloud_server.blog.ipv4_address
}
To run it, you will have to set up your environment. The flake in the project’s repository contains a devShell section that provides the binaries required to run it.
If you have direnv integration enabled, you will need to run the following command:
direnv allow
And your shell will magically receive all the required binaries. To deploy the code, run:
tofu init # downloads the providers
tofu apply
After a couple of minutes, you should be able to check the DNS address. It should point to the valid ip address of the machine that you have just created:
nslookup blog.flakm.com
If it does, you should be able to log in to the machine using ssh:
Job well done Link to heading
At this point, We’ve managed to create the following resources:
- Hetzner instance with public IP with ssh that gives root access
- DNS A record that points to our instance
- Proxied page in cloudflare
- Declarativelyt partitioned disks on Hetzner instance
- NixOs installed
- Way to deploy changes using nix using ssh
We are ready to use nix!
Taking over the ubuntu host <3 Link to heading
NixOs deployment Link to heading
So now we want to add our rust backend to the host. We can add new flake input that points to our backend and configure the service:
# flake.nix
{
  inputs = {
    ...
    # 🆕👇 Add the backend flake as an input
    backend = {
      url = "path:./backend"; # Points to the flake in the backend directory
      inputs.nixpkgs.follows = "nixpkgs";
    };
  };
  #                           🆕👇
  outputs = { nixpkgs, disko, backend, ... }@attrs:
    let
      system = "x86_64-linux";
      pkgs = import nixpkgs { inherit system; };
    in
    {

      # NixOS configuration for the 'blog' system
      nixosConfigurations.blog = nixpkgs.lib.nixosSystem {
        inherit system;
        #🆕👇
        specialArgs = attrs;
        modules = [
          disko.nixosModules.disko # Include disko module
          ./configuration.nix # Include custom configuration
        ];
      };

      #🆕👇
      # Merge the checks from the backend flake into the root flake's checks
      checks.${system} = nixpkgs.lib.recursiveUpdate
        (backend.checks.${system} or { })
        {
          # You can also add additional checks specific to the root flake here
        };
    };
}
And now we can configure the service in configuration.nix:
#configuration.nix
# 🆕👇          👇
{ modulesPath, backend, ... }: {
  imports = [
    (modulesPath + "/profiles/qemu-guest.nix")
    ./disk-config.nix
    # 🆕👇
    backend.nixosModules.x86_64-linux.default
  ];

  # ...
  networking.firewall = {
    enable = true;
    allowedTCPPorts = [ 80 443 ];
  };

  services = {
    backend = {
      enable = true;
      domain = "blog.flakm.com";
    };

    nginx = {
      enable = true;
      virtualHosts."blog.flakm.com" = {
        forceSSL = true;
        enableACME = true;
      };
    };
  };

  security.acme = {
    acceptTerms = true;
    certs = {
      "blog.flakm.com".email = "[email protected]";
    };
  };
  # ...
}
Nginx and acme are inspired by NixOs wiki entry for nginx wiki.
It uses Acme bot to set up TLS certificate for our backend.
Finally, it enables and configures our service called backend
And here is the part that seemed magic to me. If we want to deploy our flake to the machine, we’ll have to run the following:
nixos-rebuild --flake .#blog \
  --target-host [email protected]  \
  switch
It will build the flake locally using the whole power of the local machine with all the valid inputs and ship the binary packages over ssh:
# ...  redacted
copying path '/nix/store/hsqvcmn9w9cin2xy74l7gma2n579z09j-quick-start-0.1.0' to 'ssh://[email protected]'...
copying path '/nix/store/yilxvsbxh1nybiy7j4zfw6dlvzw9rn2h-unit-backend.service' to 'ssh://[email protected]'...
copying path '/nix/store/k7sgdp698500a53lbb3mi7hx67kf19xr-system-units' to 'ssh://[email protected]'...
copying path '/nix/store/jkxgii5n3bakf6jxycadb1g3sr9m6gmi-etc' to 'ssh://[email protected]'...
copying path '/nix/store/3lmdyrsja06r2ps5s601vhxcgwqijy5c-nixos-system-unnamed-23.05.20230406.0e19daa' to 'ssh://[email protected]'...
updating GRUB 2 menu...
activating the configuration...
setting up /etc...
reloading user units for root...
setting up tmpfiles
Can it be working already? Let’s check in the browser.
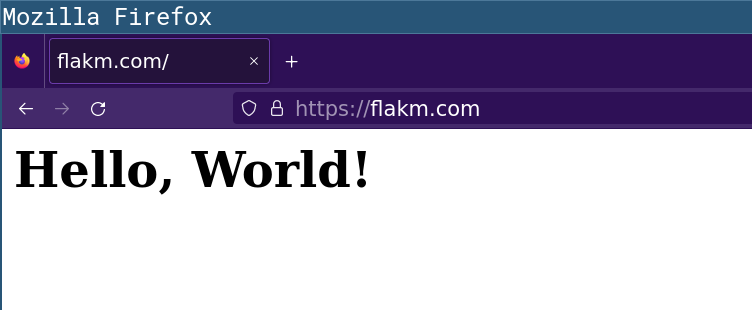
❯ curl https://flakm.com -i
HTTP/2 200
date: Mon, 04 Dec 2023 19:54:14 GMT
content-type: text/html; charset=utf-8
cache-control: max-age=14400
cf-cache-status: HIT
age: 7193
last-modified: Mon, 04 Dec 2023 17:54:21 GMT
accept-ranges: bytes
report-to: {"endpoints":[{"url":"https:\/\/a.nel.cloudflare.com\/report\/v3?s=M9yYuM%2FA6C92dT0rl78GlMF85txhiMo%2BCwzP4GRulgBtaVbjqUSJcHXvhmGXGg9jNaTx4dKApH%2F5iWzxUvRvkJXucXx7xNxbjSRZ9lLCW094fai4sYYrJFOxomg%3D"}],"group":"cf-nel","max_age":604800}
nel: {"success_fraction":0,"report_to":"cf-nel","max_age":604800}
server: cloudflare
cf-ray: 8306999ff99cbf65-WAW
alt-svc: h3=":443"; ma=86400

<h1>Hello, World!</h1>%
It is working, and caching works!
Also, notice that I did not mention installing any binary on your system (like tofu or docker). It’s been all taken care of by direnv configuration and nix’s magic.
Summary Link to heading
So, to sum up. Until now, we managed to:
- Build a flake that wraps a Hello World rust server with a series of checks
- Expose backend flake as a NixOs module with two flags that run binary using the systemd service
- Write opentofu module that provisions our machines, DNS records, and configures Cloudflare to cache the content
- Provision resources
- Write flake that takes the backend as input and configures nginx with ACME bot for valid TLS configuration
- Deploy that flake to production using a single command that could be easily performed on CI
It’s not too bad for such a simple setup.
In the next entry, I’ll write down how to secure the host using wireguard derivative and add some hardening to services before adding ActivityPub integration to the backend.